Jeep JL 3rd Brake Lite Relocation Mount
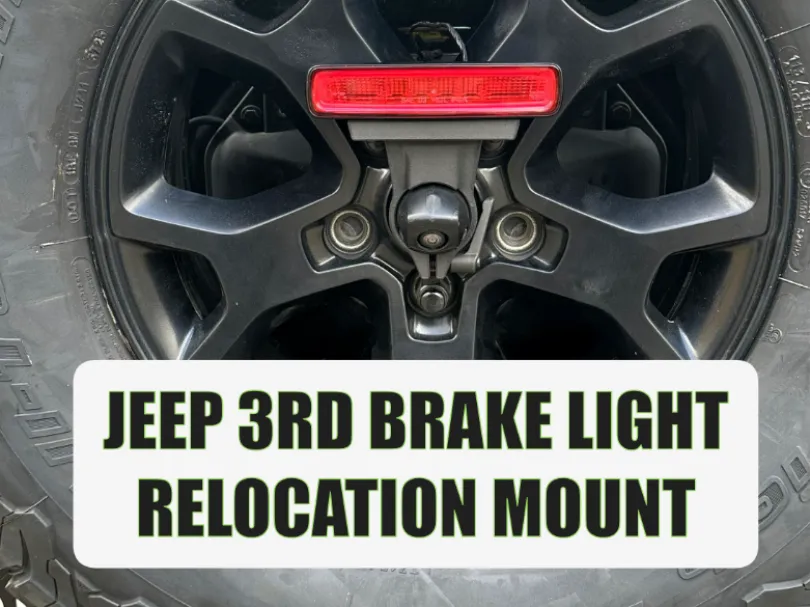
Boost MeIf you appreciate my work... it is free. Want to free up some visibility in the back window? Want to make your Jeep look different than all the rest? Want easy accessibility to remove your spare and still have a brake light that looks like it should have been there from the beginning? Well then, you are in luck. Quick ReleaseTorx40 (from Jeep toolkit)WhyI wanted to remove the current “riser” for the brake light on my 2019 Jeep. Every relocation kits out there requires different lug nuts with threads to be able to screw into. Then you need make sure you carry an Allen key to unscrew the mount if you want to use your spare. My mount can be used with a “quick release” OR a T40 screw, so that you can use the Torx bit in your Jeep toolkit. Simple.OperationRemoval is as easy as loosening the bolt and disconnecting the wire from the light. After you replace the spare, re-attach the wire and slide on the mount and tighten it up. Easy Key PointsWorks only with the stock spare tire mount. You will need to remove the stock plastic lockable cover that Jeep supplies. This is pretty useless anyway, if you want to secure your spare, put a “keyed” lug nut on the wheel. Use the hole in the mount to help straighted the plug for sliding on. HardwareT40 mountT40 Bolt 20mm - https://a.co/d/0c7qZGSCM8 Lock Nut - https://a.co/d/08ewzI7HQuick ReleaseLever - https://a.co/d/077tw27WM6 Square bolt 20mm - https://a.co/d/07EUeWLLWire holders (Optional)3M Cable Clips - https://a.co/d/07qYoMms Stock Brake Riser Light RemovalRemove plastic lock from camera - T40 bitRemove spare tire from mount - 22mm socketLoosen the 8 bolts from spare tire carrier - 13mm socketRemove the 7 bolts from front of brake light riser mount - T25 bitSeparate back half from frontRemove brake light wire from riserRemove 4 bolts holding riser from tire carrier - T25 bitRemove riser from JeepRemove 2 screws holding light to riser - T25 bit (will reuse these screws and light)Unplug wire from lightRe-attach spare tire to mountNew 3D Printed Mount InstallRoute wire thru wheel how ever you want.Use some double-sided adhesive with zip tie if you want to secure wireMount the light to your print using the two T25 screws. Open end of mount faces back.Connect wire to light. Feed directly from back of mount. DO NOT feed wire up through hole.Slide mount onto camera. Nubs inside round hole should fit into slots on sides of camera enclosure.Tighten mount with T40 from toolkit OR if quick release, pull the lever out and tighten hex bolt. Once tight, twist the quick lever up to lock in.